
Yorkshire materials
In my exploration of natural dyeing, I wanted to use material that I had either gathered from the local landscape or had grown myself. I did not want to buy pre-prepared material nor raid the kitchen for something that was not indigenous to the UK, such as turmeric or, the so 1st world, avocado. This obviously restricted me to something I had access to here in Yorkshire, but also meant I would have to work with the seasons, choosing the time of year as and when, during the plant’s growth cycle it rendered its peak tendency to surrender its precious colour to my yarn.
Herdwick wool
My chosen medium is the wool from my flock of Herdwick sheep, which I have had spun into a woollen yarn. I got two ecru (natural) shades from the fleeces, a light silvery grey and a dark charcoal grey. The silver grey should over-dye giving some nice melange shades. Although the yarn is far from soft it has a lot of “character”. It is coarse textured, and its flinty aspect reflects the rugged windswept crags of the Lake District from where the Herdwick sheep originates.

Inspiration
I was also inspired by the work of our studio holder Oonagh Corr. Her beautiful and delicate woven vessels use the lowly bramble plant. She transforms the plant’s long and viscous runners into intimate, comforting objects. I decided to see what delights this ubiquitous plant would surrender to the natural dyer.

Foraging
One beautiful, warm, spring evening, armed with my secateurs, I strolled along the farm track listening to the lambs calling to the ewes in the adjacent field and collected a basketful of tender bramble shoots – bright, sap green, with their immature prickles soft and flexible.


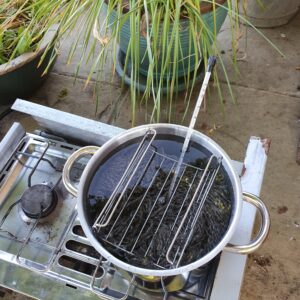
The settled weather had also made it easier for me to set my dye kitchen up outdoors, on the paving outside the studio. I pulled out the trusty old camping stove and got hold of a large stainless-steel stock pot. Once I had gathered the same weight of shoots as wool, I chopped the brambles up and steeped them in water for a day or so, before bringing it slowly up to a simmer on the stove. Now at this point the steam from the dye vessel gave off a wonderful aroma of berries, so it is not true that dyeing is always about nasty smells. However, much to my disappointment, after an hour of gentle bubbling the liquor had turned an unpromising sludgy green, not the clear yellow I had hoped for. Where had the bright green of the shoots gone? I strained the plant material through muslin to give me my dyebath, an opaque greeny broth.


Mordants and Modifiers
Meanwhile I had taken a hank of the woollen yarn and applied a mordant and a modifier. The mordant helps fix the dyestuff to the wool, giving a faster colour (less likely to fade). If you don’t use a mordant there is a danger you just end up staining the wool rather that dyeing it. Dyeing chemically fixes the dyestuff to the fibre, whilst staining just leaves a deposit of the pigment on the surface of the fibre, which will eventually come off over time. I chose to use Alum this time, hoping for a yellow colour. The mordant also affects the final shade, I could have used Copper Sulphate, which would give a much darker, almost tan, shade. I also added Cream of Tartar as a modifier, which helps deepen the shade. I decided not to rinse off the excess mordant as the coarse Herdwick wool I am using is less likely to absorb colour than finer wools would, so the more mordant the better. But this did mean I ran the risk of the dyed yarn being less soft to touch and with a sticky deposit being left on the yarn.

Patience
Now, three days had passed since I had collected the bramble shoots and finally, I was ready to actually dye the yarn. Like so many crafts, I was learning that natural dying needs patience, and has a degree of unpredictability.
Taking the plunge
As I plunged my precious wool into the dyebath, I thought, “there is no going back now”. As I slowly brought the vessel up to temperature, I looked at its unpromising drab colour and I couldn’t see how a nice yellow yarn would emerge. I hoped that I wouldn’t end up with the non-descript khaki shade of the dye liquor. I had to keep agitating the yarn to ensure that I got an even distribution of colour, but it is a fine line – too much movement and the yarn will start to felt and shrink. I also fashioned a cage to keep the yarn submerged in the liquor.
Sleep on it
After an hour of simmering, I let the vessel cool down and left it steeping overnight to absorb as much of the dyestuff as possible. As I went to bed everything still looked pretty dull and unpromising. I was feeling a bit despondent after all the hard work and anticipation.
Results
The following morning, I returned to my dye kitchen and extracted the hank from yarn from its dyebath. I could see that the yarn had definitely taken up some of the colour from the liquor. The next stage was to thoroughly rise the yarn, would all the colour wash out? Thankfully, the dye had “taken” and after 3 rinses the water was running clear and I had in my hands a definitely green hank of wool. Twenty-four hours later the yarn had dried to a lighter apple green. Despite not being yellow, I am quite pleased with the resulting shade. The natural colour is soft and muted and should add to some interest to my woven designs, which have all been monochrome so far.

Welcome to the world of colour! I can’t wait to try another plant and see what surprises it has in store for me.

Fancy a go yourself? Book onto our Natural Dyeing course here.
Back To Blog Next (Chairs of the Mill) Prev (Ones to Watch: Interview with Jade Connolly)Tags
General Museum & Archive Arts & Culture